h1

Covering Pillows

February 7, 2013

My brother and sister-in-law bought a new couch recently and I offered to cover pillows for them.

My sister-in-law provided the supplies and I figured out a way to work without a pattern. It’s not the most scientific method, but it seems to have worked and I didn’t need to take a trip to buy a pillow cover pattern.
DSC04977Because pillows are thick, I knew I had to account for their width when establishing the dimensions I needed. Luckily, these pillows were not oddly shaped so this was easily accomplished
I rolled the pillow to each edge on the fabric and marked the touch down points with pins.
DSC04978I cut along the pins to make a large square. This was for the front side of the pillow. I then cut a piece that was 3/4 the length of the square but the same width and another piece that was about 1/2 the length of the square. These pieces were for the back where the opening to insert the pillow would be.

I folded down and hemmed a section of each small piece. I used a zig zag stitch to make it a little bit decorative.
DSC04980Then I layered the two back pieces on top of the front piece so the shorter piece would be on the inside when the pillow sham was turned right side out and I serged the whole thing together.
DSC04975Of course sergers leave long lines of serged thread at the end. My serger class taught me to finish serger seams by threading the excess thread into a needle and weaving it back into the serged seam.
Because there are four strands of thread braided together, the piece is too big for the eye of a standard needle. I use a darning needle and thread the excess back through the actual stitch rows rather than the loops.
DSC04981Once done, I turned the shams right side out and stuffed the plain pillows inside.
DSC04984The finished product.

h1

A Perfect Zipper

February 5, 2013

I am working on the SWAP, but I am somewhat behind on my work plan. I have completed my December goal but I have not yet started making the pants or coat.
In the process, though, I had a chance to practice zippers a bit. Invisible zippers have always been a struggle for me. I have an invisible zipper foot but I’ve had difficulty stitching close enough to the zipper teeth to actually make the zipper invisible. You may have noticed that the zipper tape is often visible which is the exact opposite of how it is supposed to be.

I’m rather proud that I got it right for this version of Burda 8155: my favourite skirt pattern.

Image

See, no zipper tape.

h1

A dress for a wedding

February 3, 2013

Last summer, my sister asked me to sew her a dress for a wedding she was going to. She chose McCalls 6557 and some cream cotten eyelet with navy blue accents.

I made a muslin with a little bit of help…
Image

Once I made the muslin, my sister came over for a fitting so I could do the necessary alterations.

Here is how the dress turned out.
Image

From the front
and
from the back
Image

She says the dress was very comfortable to wear.

h1

Getting Serious About 2013

January 12, 2013

Okay, if my week at work was any indication, the holiday season is over and 2013 has officially begun. This means I’m a little late on my annual review and goal setting but you already know about the SWAP Plan so you’re not completely in the dark.

Last year, I made 5 sewing and blogging goals for myself. Let’s see how I did:

1. SWAP 2012. Well I completed most of it and blogged about it at the end of the summer. I didn’t get photos done in time because I got sick so I didn’t actually enter but some of the items I made have become wardrobe standards like the white pants which I wore all summer long with the highest pair of heels I’ve ever owned, and the floral blouse which officially made McCalls 5661 into one of my go to patterns.

2. Trench coat. I finished the trench coat at last!!
Here it is again because I’m excited to have finished it and I plan  to make another coat this year:
Image

3. Complete some other online challenge. Okay, I did this one but I kind of kept it quiet because I didn’t have time to blog it and because I’ve not shared much of my inner non sewing geek on this blog. Last spring, I started following the Star Wars blog and podcast (haven’t really been keeping up with the podcast) Tosche Station. And they had a contest to create a new outfit for the character Mara Jade (links to Wookiepedia) who, despite always being written as having pockets, is always drawn as wearing a skin tight catsuit devoid of pockets.

So I spent time looking at Star Wars images and got out some of my fashion and costuming books. Then I got all Frankenpatternie, bought a wig that doesn’t quite flatter my skin tone, and came up with this:

Image
I think I would like to spend more time figuring out how I think she would have actually dressed. There could be some designing in it.

4. Comment on Sewing blogs. I’ve tried to  be good about commenting but I didn’t become the contributor I intended to be. I’ve found that Blogger isn’t always good about recognizing my WordPress identity so I wind up just commenting under my name. I will have to work on that more.

5. Read Costuming books. I read through a few of them but I have plenty to  go.

So that was 2.5 – 3 out of 5. I’m getting better.

This is what I would like to accomplish in 2013

1. SWAP 2013. I would like to complete this year’s SWAP and then I think it might be time to take a break from this particular contest and explore others.

2. Learn to sew undergarments. I’m one of those people who can never find attractive looking bras in my size, so I’d like to learn how to make my own.

3. Take part in 2 other online challenges/contests. Contests help me learn to sew to a deadline which is something I have difficulty doing.

4.Redecorate my sewing room. The room needs to be decorated and I would like to do that this year.

5.Add more in process photos to my entries. Sometimes I forget to take photos while sewing. I want to remember to do more of this this year.

I didn’t quite make my first goal on my SWAP work plan. I made the two shirts but haven’t done the skirt yet. That is on the agenda for this weekend.

I will have pictures.

h1

SWAP 2013: Third Time’s the Charm

December 26, 2012

I have decided to try the Stitcher’s Guild SWAP (Sewing with a Plan) Contest again. I successfully completed all the pieces by the deadline for SWAP 2010, but for the last two  years, I have come up short time wise. Still, I consistently find I have enough NSOs and fabric in my stash that I can develop a SWAP plan without doing a lot of purchasing.

So, this year the contest is to create two different mini collections with a crossover piece  that works with both of them. I’m going to do one contemporary collection and one vintage inspired collection with a coat that will crossover between  the two of them.

Collection 1: Contemporary Professional
2 bottoms, 3 tops

1.Vogue 1051 – dress pants in brown. Because there are fewer items to sew this year, I will do all of the details this time around. All buttons and welt pockets. I have a habit of leaving the back ones off, but not this time.
2. Vogue 1059 OOP – dress pants in black. I bought this pattern during the last BMV out of print patterns sale. I will do View A because I prefer the zipper in the front.
3. McCalls 6122 – white button down shirt. This is an NSO I’ve had fabric for for a couple of years now. It was part of my SWAP 2012 plan but I ran out of time and made a different shirt instead. This shirt can be worn with either pair of pants
4. A lacy knit top using Simplicity 4023 as a base. I’ve used this simple knit top pattern as a template for several knit shirts. I have some white lace that I plan to use this time. It will work with either pair of pants
5. Butterick 4556 OOP – knit shirt in  grey. I’m planning to do view A with the decorative tie at the neck.

Collection 2: Vintage inspired2 tops, 1 bottom, 1 dress

1. Colette Patterns, Jasmine blouse – I plan to make this blouse out of some red and pink fabric that I designed on Spoonflower so it is an experiment in all respects. It has a tie at the neck so it will connect it a bit with Butterick top from the first collection.
2.White cotton blouse inspired by this Vintage Pattern on Pinterest
3. Burda 8155 – My new favourite pencil skirt pattern. I’ll make this one in black so it can be worn with both tops.
4. I’ve decided to do a Little Black Dress for my dress for this collection. I have never really had one before so I decided that a vintage inspired one would be a good choice. It will be inspired by this vintage pattern. I plan to work with Simplicity 3673 and then create the cowl back.

Bridging Piece:
We need to create a bridging piece for this SWAP. I plan to do a Spring coat. I bought fabric awhile ago to make a knee length coat. The fabric is floral printed so the coat will supplement my trench coat but not replace it. I plan to design it myself rather than use a pattern. It will have a high neck, flare at the waist and have slit pockets in the front.

Work Plan.

In order to stay on top of this SWAP, I need to give myself some deadlines along the way so I can tell if I’m falling behind. April tends to be busy at work so I need to get as much done as possible before then. Here are my targets:

December:
By the end of December I would like to have completed the two knit tops from Collection 1 and the Burda pencil skirt from Collection 2

January:
January is pants month. I need to get the two pairs of pants done in this month and I would like to get the Jasmine blouse done as well.

February:
This month I sew the coat. Since I still have to develop it, I expect this will take all month.

March:
In March I need to get through the button down white shirt, and the vintage inspired cotton blouse

April:
This leaves April for the Little Black Dress and anything else I am behind on.

Let’s see how I do this year.

h1

Sew Curtains

December 14, 2012

So I’ve taken a break from clothing sewing and branched out into a bit more home decor. It’s taken a year but I’ve finally done some decorating in our house. My Christmas gift to my husband has been to redecorate his gaming room so he can use it as an office as well. I took the opportunity to make it into a room that a video game geek would love.

One of the key elements to this was the window treatment. The game room has a southern exposure so it gets a lot of light during the day and the light causes glare on the TV screen making it difficult to play. For the past year, we have dealt with this by draping an old rubber backed curtain over the window and holding it in place with thumbtacks. It was functional but looked awful.

BEFORE:curtain
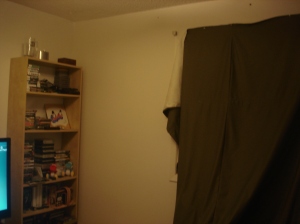
There is clearly room for improvement.

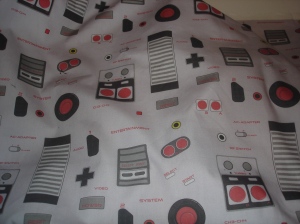
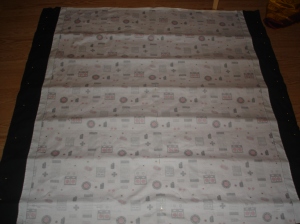
I decided that the curtain would be a focal point for the room and went looking for some fabric that would appeal to a geeky gamer. I struck gold at Spoonflower.com where I found the design 8 Bit Memories, created by ilikemeat.  I had the option of different types of fabric and different weights. I bought two yards of the pattern in cotton poplin.

DSC04920

Of course the fabric is 42 inches wide and the window is 49 inches wide because that’s one of life’s rules, so my first step was to add a side border to the fabric to make it wide enough. I chose to do mine in black broadcloth.

DSC04921
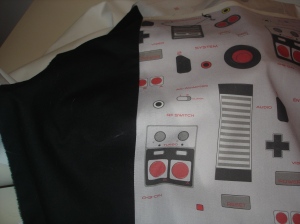
I think the black helps bring out the colours and images in the fabric as well.

I googled around for directions on making one’s own Roman Shades and eventually decided to follow the ones written by Steven and Chris who have a design show on CBC. I particularly liked their use of doweling and their helpful diagram.

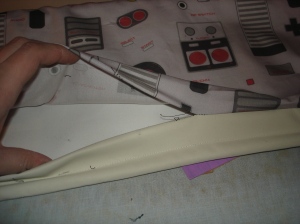
I bought rubber blackout curtain lining because I knew the grey poplin would be pretty see through. I knew I should buy extra lining to allow for the creation of pockets for the dowels. Luckily this was easy as Spoonflower, like most American stores, sells fabric by the yard, and my local fabric store sells it by the metre so I had a built in length cushion.

I measured the fabric and marked out evenly spaced pockets for dowel rods. At first I made the pockets 1 inch in circumference but that got rather tight for the dowels so I increase them to 1.5 inches and spaced them about 8 inches apart.
Then I sewed the pockets in place and inserted the dowels.
DSC04926
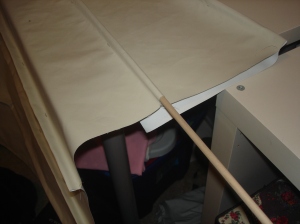
I used 7 dowels in  total. I didn’t use one right at the top because the instructions suggested using velcro to hang the curtain and a dowel would get in the way. I inserted one right across the bottom to weight down the last section and ensure it hung well when both open and closed.

Next was the hardest part. I had to centre the decorative fabric on the lining and ensure that the sides were straight and square. I did not have enough room in the sewing room to lay out the whole piece on a table so I wound up laying it out on my dining room floor.
DSC04928Stitching it together with the dowels was also a challenge
DSC04930 …and required some correcting
DSC04931But finally I had it all together.

The next step was to sew curtain rings at evenly spaced points across and down the curtain. I chose to do five rings across and six down to ensure there was plenty of support. The rings are clear plastic and are nearly invisible against the lining. I stitched each one to  the dowel.

Then I strung white string up through each column of rings and across to the top left and stitched velcro to the top of the curtain.
I stuck the other side of the velcro to the top of the window frame and hung the curtain.

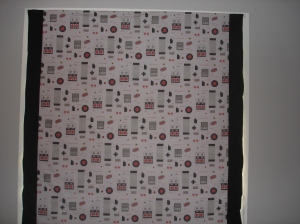
This is how it looks when closed.
DSC04941I practiced pulling the strings to pull the curtain up and had to play with the tension on the different strings to make sure both sides of the curtain pulled up evenly. At first, the uneven strings cause the velcro to come undone, but once I made it even, that stopped happening.

When I had it right, I tied a knot in the strings to hold them at those varied lengths.

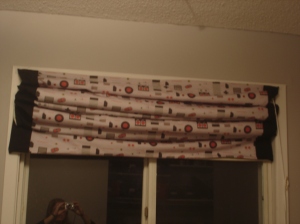
This is the open shade
DSC04945
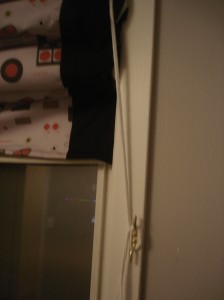
I then bought a curtain  tie holder that would hold the curtain in place when it was open.
DSC04947
I’ve noticed that my husband has started opening the curtain during the day to let the light in while he is at work. This, no doubt, makes the room more attractive to the sun seeking kitty cats.

h1

SWAP Review/ Trench Sew-a-long

October 1, 2012

Okay, so my final push to finish my SWAP allowed me to take advantage of the rule that allowed for a couple of items to be started before the SWAP start date. I was running short on time and realized that I already had a partially complete coat: The Trench Sew-a-long coat.

I finally finished it!

This coat started as Vogue 8346. I selected the double breasted version, shortened it, increased the fullness of the skirt and added some trench coat features such as the epaulets on the shoulders. I also added pockets and pocket flaps because I need pockets.

While I know it is not perfect, I do wear it fairly regularly when a lightweight coat is helpful to have.

Here is another shot, closed:

And here is the lining. I love making neutral coloured items and then lining them with something bright:
Hopefully this coat is just the first of several coats as I have more ideas to work with yet.

h1

SWAP Review #5: Two pencil skirts

September 26, 2012

So, despite my best intentions, I was not able to enter this year’s SWAP contest at Stitcher’s Guild. I got most of the sewing done, with some modifications to the plan but promptly got sick and wasn’t able to finish taking photos in time to submit them.

I still want to work through the items I made though. This year’s SWAP involved creating two iterations of the same article of clothing or even the same pattern when possible for several items and then creating a few other items as well.

I had the option with this SWAP, when creating two of the same type of clothing item, to either use the same pattern or not. For the skirts I decided to use two different patterns.

For the first skirt, I made yet another version of Vogue 7937.

This is, possibly, my favourite pattern. It is easy to sew, is small enough that Views A and B can practically be made from scraps. I have made views A and C in the past so this time I wanted to made view D. I pulled out some leftover four ply silk from an ill fated suit I tried to make a few years ago and stitched it up.

Here it is with the pink silk blouse I described earlier.


The other skirt was inspired by my RTW skirt shopping trip much earlier this year during which I decided that I really wanted a high waisted, wiggle skirt.

I had some tweed fabric that I will hopefully make a suit from in the future and I used it to make Burda 8155.

Here that one is:

It works quite well for work.


h1

SWAP Review #4: The Dress

September 20, 2012

So, despite my best intentions, I was not able to enter this year’s SWAP contest at Stitcher’s Guild. I got most of the sewing done, with some modifications to the plan but promptly got sick and wasn’t able to finish taking photos in time to submit them.

I still want to work through the items I made though. This year’s SWAP involved creating two iterations of the same article of clothing or even the same pattern when possible for several items and then creating a few other items as well.

I was supposed to make 2 dresses but I only got one done. The other version of the pattern was a definite wadder but I have managed to give it a second lease on life as a swimsuit cover up.

This dress was inspired by Diane von Furstenberg’s Maja Dress, made famous by the Duchess of Cambridge who has worn it on several occasions.

Hers was green silk but my budget was slightly smaller than would allow for that – and besides I wanted to be inspired by the dress, not to copy it outright.

The pattern I found for the basic shape was Butterick 5211. It’s a Fast & Easy dress with a straight cut and a boat neck at the front like the Maja dress.

I found navy acrylic with a vaguely Rajasthani print on it (okay I thought it reminded my of the Rajasthani prints I was shown in India but I expect it is lacking something key) and I bought flat silver buttons rather than the flat gold ones of the original.

I did a muslin in which I used the same neckline in  the front but trimmed the neckline to a point at the back and added fabric to overlap for buttons rather than the zipper in the original pattern.

I played with darts for a bit trying to recreate the slight bagginess of the original pattern but I didn’t have much luck. I could not tell if the dress had dolman sleeves or not but I suspect it does and my set in version ensured a slightly different shape.

The dress is also completely lined.

Here is the front:
And here is the back:

h1

SWAP Review #3: Pants

September 12, 2012

So, despite my best intentions, I was not able to enter this year’s SWAP contest at Stitcher’s Guild. I got most of the sewing done, with some modifications to the plan but promptly got sick and wasn’t able to finish taking photos in time to submit them.

I still want to work through the items I made though. This year’s SWAP involved creating two iterations of the same article of clothing or even the same pattern when possible for several items and then creating a few other items as well.

I managed to make one pair of pants of the two I originally planned to make. For this I returned to one of my favourite patterns: Vogue 1051 – The Alice and Olivia dress pants.

I’ve made these pants before in black and grey so it was time to make them in white – a brown version is planned for the future.

One thing I did differently with this version was to leave some extra length below the knee because I had bought a new pair of heels that are higher than any of my other shoes so I made these pants the appropriate length for those shoes.